Phaser Platformer Series: 23 Tilemaps
posted on 30 August 2021
In this tutorial, we’ll be creating a basic tilemap and loading it into our game. We’re going to be using the open source tilemap editor Tiled.
Here is what we’ll be making:
See the Pen
Phaser Platformer Series: 23 Tilemaps by Digitherium (@digitherium)
on CodePen.
If you are viewing on a mobile, you can open a version of it here without all the codepen chrome taking up screen space so you play it in landscape mode.
A tilemap is a really nice way of building levels using sprites cut up into blocks or tiles. Each tile is the same size, typically 16px x 16px or 32 x 32px, but in can in theory be any size. In order to build a tilemap, you need a collection of sprites laid out in an evenly sized grid, known as a tileset. Luckily for people like myself who don’t have the time or skill to create nice graphics, there are loads of great free resources out there such as https://opengameart.org/.
We’re going to be using the ‘Grotto escape II’ tileset created by the very talented, ansimuz. You can download here. It’s also available on his website, which I encourage you to take a look at as there is some beautiful stuff on there. There is free stuff, paid stuff, sprites, music – all sorts, all really great quality.
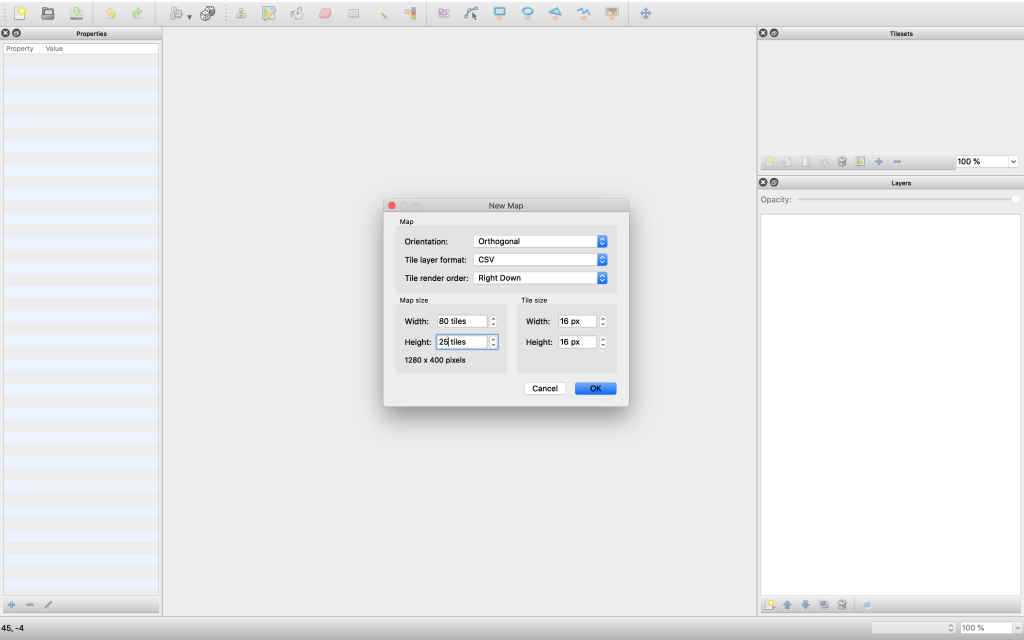
The first thing we do is load up Tiled and create a new file. There are some settings in the dialog box that appears upon creating a new map. We want the orientation set to ‘Orthogonal’, the Tile layer format as ‘CSV’ and the Tile render order as ‘Right down’. We need to set the size of our tiles (for this tileset it’s 16px x 16px) and also the width and height of our game in tiles. We’re gonna go for 80 x 25. Click OK and it will create your blank file.

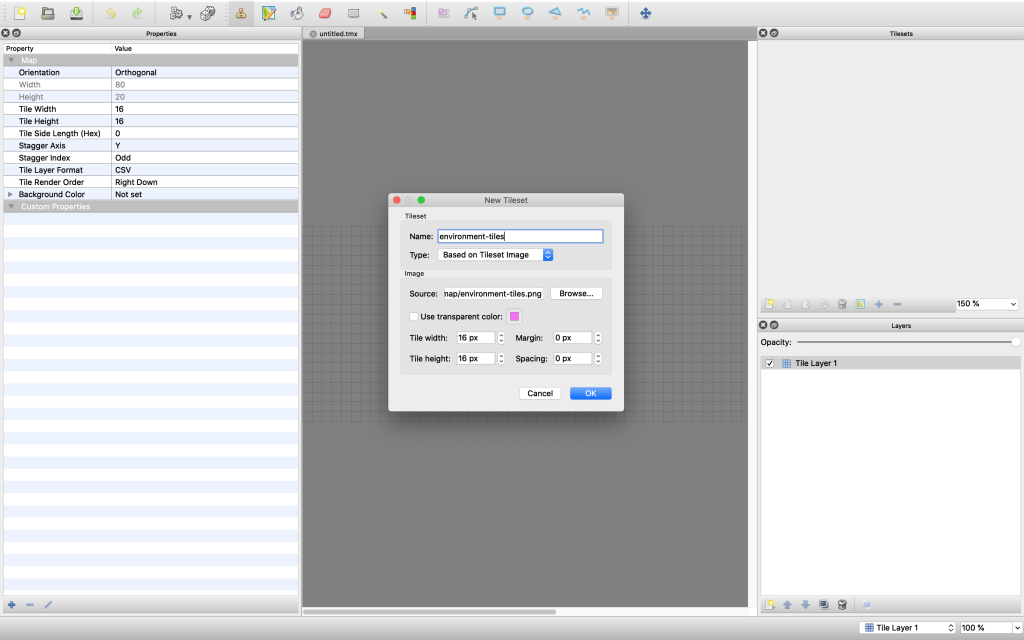
Next, we need to load in our tileset. In the right-hand column in the Tilesets panel Click the icon of the document with the star to load a new tileset. Again, you need to specify the tile size as 16px x 16px. Browse to the file and it will load in and automatically name the tileset, based on the file. You can rename this now if you want, or edit the tileset later. The name of the tileset is important as we need to reference it in Phaser later.

With our tileset loaded we can go about placing tiles. Much like the tileset naming, the naming of your layers is important, as we need to reference them in Phaser. Let’s rename the layer to be called ‘platforms’. You can draw using the stamp tool and selecting the tile you want to place. You can draw more than one tile at once by holding shift when selecting tiles – very useful for when the artist has laid out the tileset as nicely as this one. Instead of placing tiles one by one, you can grab big sections and build a level quickly.
This ‘platforms’ layer is going to be the part of the game our character interacts with and stands on. We can also create layers that are purely to look good – some nice graphics in the background, etc. If we create these as separate layers in Tiled, it makes our lives much easier when in Phaser as some layers will have complex logic, and others will simply just be placed on the screen as eye candy.
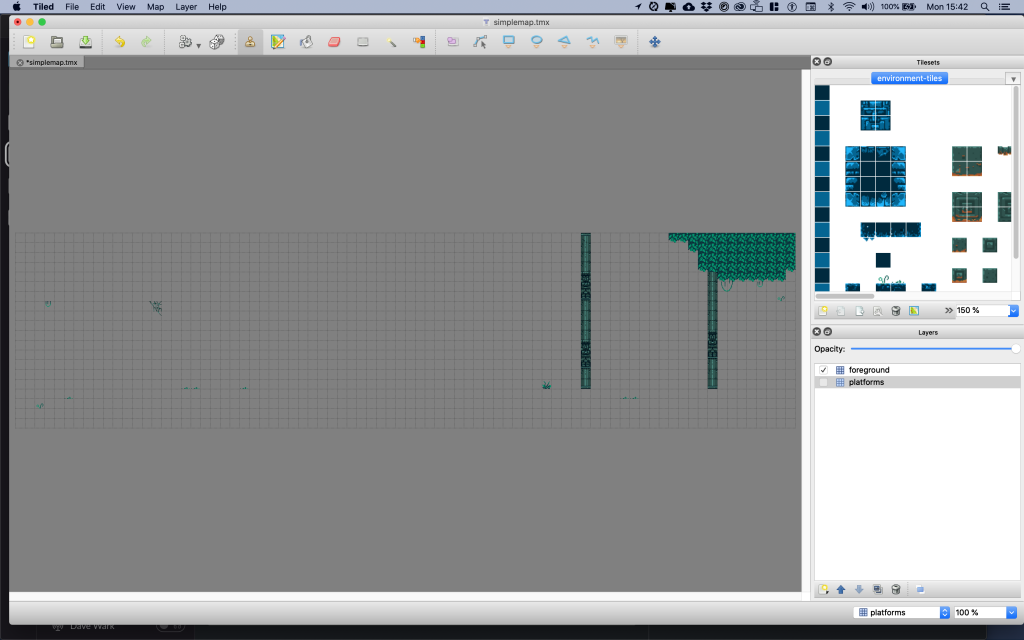
Let’s add a layer called ‘foreground’ and add some finishing touches like tufts of grass and pillars. If I turn off the platforms layer, then you can see more ‘foreground’ layer is all just embellishments. I’m actually going to stick this as a visual layer in front of the character (hence the layer name ‘foreground’!) to add some depth to our game.

You can obviously save your tilemap which will let you re-edit it, but you’ll want to export it as well. It’s a bit like saving a photoshop file as PSD but then exporting some layers as images like a PNG. The design/source file in Tiled is a .tmx, whilst the file type we use in our game is .json. We need to export as JSON, and save that resulting file in our assets folder. I’ve created a subfolder called ‘map’ to keep it all tidy. You’ll also want to put a copy of the tileset png file (environment-tiles.png) in that folder.
Diving into our Phaser code, we need to preload both our Tilemap and Tileset. We do that in preload like this:
this.load.image('tiles', '/map/environment-tiles.png');
this.load.tilemapTiledJSON('map', '/map/simplemap.json');
Our tilemap is loaded as a tilemapTileJSON, and our tileset is just a regular sprite. This tileset should be the same file we loaded in Tile. It can be a duplicate of it stored somewhere else on your hard drive, but the contents of the file have to match the one in Tiled. In our create function we initialize our tilemap like this:
//create our tilemap
this.map = this.make.tilemap({ key: 'map' });
//set the tileset to use using the name of the tileset in tiled and the name of our tilesheet in preload
tiles = this.map.addTilesetImage('environment-tiles', 'tiles');
The ‘key’ parameter in that first line of code references the label we gave our tilemap JSON file in the preload function. We then add our tileset to the tilemap using addTilesetImage. The first parameter is the name of the tileset in the Tiled editor, the second is the corresponding sprite label we created in preload. This first parameter must match the name of the tileset in Tiled or it won’t work! You can find this above all the tiles in the Tilesets panel, and if you click the spanner icon you can rename it. Don’t forget to re-export for your changes to show up in Phaser.
The next thing we need to do is define which tiles expect collisions. You might have a tileset with lots of decorative background tiles and only a handful of tiles that actually require any sort of physics. In that case, you could just specify those 3 tiles. In our case, the Grotto escape tileset is laid out visually in a way that is easy to use but doesn’t lend itself well to picking specific tiles for collisions, so we’re just going to turn them all on for now.
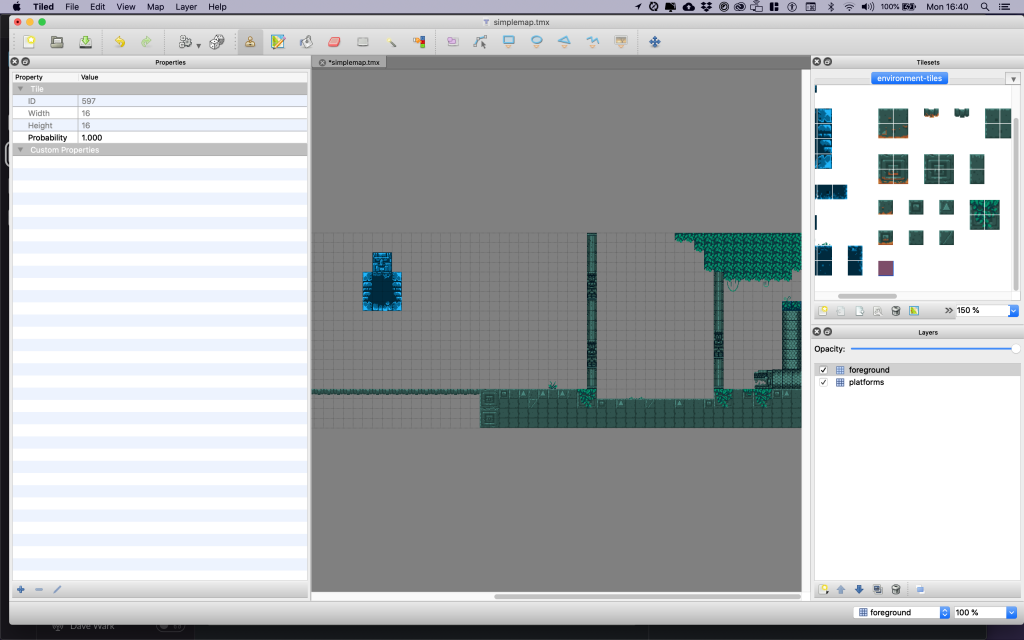
If you click on a tile in the tileset in tiled and have the property inspector open (View -> Views and toolbars -> Properties) it will tell you the tiles ID. In this screenshot, I have clicked on the orange lava tile and you can see its ID is 597.

It is these IDs that we use to tell Phaser which tiles should expect collisions, like so:
//indexes of tiles to collide with. Big tilesheet, so I've entered a high number
this.map.setCollisionBetween(0, 600);
So that is setting all tiles, from ID 0 – 600 to be able to handle collisions.
We can know define the boundaries fo the physics of our game based on the tilemap:
//set bounds of our world based on tilemap
this.physics.world.setBounds(0, 0, this.map.widthInPixels, this.map.heightInPixels);
Finally, we actually load in the layers from the tilemap:
//create layers from their names in tiled.
this.ground = this.map.createLayer('platforms', tiles, 0, 0);
this.foreground = this.map.createLayer('foreground', tiles, 0, 0);
this.foreground.depth = 10;
Those layer names match up to the ones we set in Tiled, and we tell it to use the tileset object we created called tiles. We’ve added a depth value to the foreground layer, this is to place it in front of the player. Altogether that code looks like this:
gameScene.setupTileMap = function() {
        //create our tilemap
        this.map = this.make.tilemap({ key: 'map' });
        //set the tileset to use using the name of the tileset in tiled and the name of our tilesheet in preload
        tiles = this.map.addTilesetImage('environment-tiles', 'tiles');

        //indexes of tiles to collide with. Big tilesheet, so I've entered a high number
        this.map.setCollisionBetween(0, 600);

        //set bounds of our world based on tilemap
        this.physics.world.setBounds(0, 0, this.map.widthInPixels, this.map.heightInPixels);

        //create layers from their names in tiled.
        this.ground = this.map.createLayer('platforms', tiles, 0, 0);
        this.foreground = this.map.createLayer('foreground', tiles, 0, 0);
        this.foreground.depth = 10;
}
We call this new function from our create function. Whilst we’re at it, let’s clean up the code. There was a lot going in the create function – We created the player, we create the HUD, we set up controls, camera etc. We take those bits of code, and wrap them up in their own functions and call them like so:
gameScene.create = function() {
        this.addLogo();
        this.setupTileMap();
        this.createPlayer();
        this.setupControls();
        this.createHUD();
        this.createEmitter();
        this.setupCamera();

        this.physics.add.collider(this.player, this.ground);
}
That’s much easier to read now, and on top of that it helps us with scope, as all of these functions now belong to the gameScreen object meaning that this refers to the scene, giving us easy access to all the built-in Phaser functions. Here is createPlayer as an example:
gameScene.createPlayer = function() {
        this.player = this.physics.add.sprite(40, 200, 'hero-small');
        this.player.setOrigin(.5, .5);
        this.player.setDrag(1);
        this.player.setCollideWorldBounds(true);

        //create and set an invulnerable flag for after the player has been hit
        this.player.invulnerable = false;
        //and set an invincible flag for the invincibility powerup
        this.player.invincible = false;
        //set no lives / hearts
        this.player.hearts = this.maxHearts;

        //Set bounce to 0, so our hero just lands directly
        this.player.setBounce(0);
        //Set top speeds
        this.player.body.maxVelocity.x = this.maxPlayerSpeed;
        this.player.body.maxVelocity.y = 500;
        this.player.isBig = false;
        this.player.isChangingSize = false;
    }
You can see it’s all the exact same code from create, but stored in one sensible place instead. In create, we have removed all the physics colliders for now except this one:
this.physics.add.collider(this.player, this.ground);That ensures that our player collides with the ground object (which contains all our tiles from the ‘platforms’ layer or tiled). So as well as setting the collision for each tile based on their ID, we still have to set up colliders as before. Upon loading the tilemap, we specify which tiles are eligible for collisions, but we have to actually create the colliders for that too – it requires both to work.
Because we are now using a tileset that is 16x16px it makes sense to resize our player from 22px x 22px to 16px x 16px. There is a new sprite called hero-16.jpg that is loaded in, in place of the old sprite. It just fits this game world much better.
Finally, there was a small bug in the old code in the update function:
//if not pressing up key...
if (!cursors.up.isDown) {
    //if player is touching ground / platform then reset jump parametrs
    if (this.player.body.touching.down) {
        this.jumping = false;
        this.touchJump = false;
        this.prevPos = 0;
    }
}
The check here for body.touching.down is false once we load in a tilemap. This meant you could jump once, but then the jumping flag was never reset so it would not let you jump again. Not sure of the exact reasons why – with sprites, this was firing as touching.down was true. The tilemap is triggering body.blocked.down instead – if we check through our code we see that we set the variable standing in the update function like this:
this.standing = this.player.body.blocked.down || this.player.body.touching.downThat checks for blocked OR touching, which is what we actually need and should have had. So we just change one line in our update function so it now looks like this:
if (!cursors.up.isDown) {
    //if player is touching ground / platform then reset jump parametrs
    if (this.standing) {
        this.jumping = false;
        this.touchJump = false;
        this.prevPos = 0;
    }
}
And that fixes the one-time only jumping bug.
Now we have a much better-looking level, but obviously nothing in it but our hero! In the next tutorial, we’ll take a look at object layers in Tiled and add all our game objects back in. That’s coming soon.
chromeless mobile version
view all the code on codepen
download the source on github.